 |
Home | Search | Browse | About IPO | Staff | Links |
|
Home | Search | Browse | About IPO | Staff | Links |
|
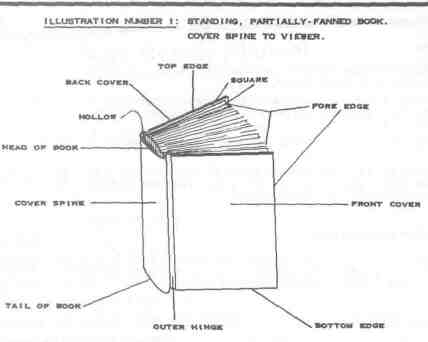
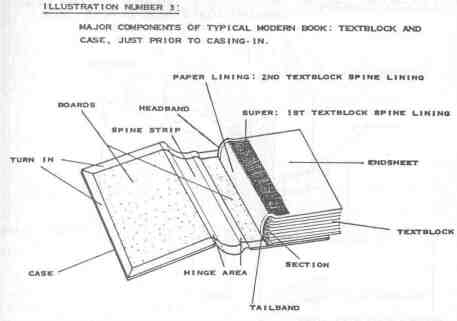
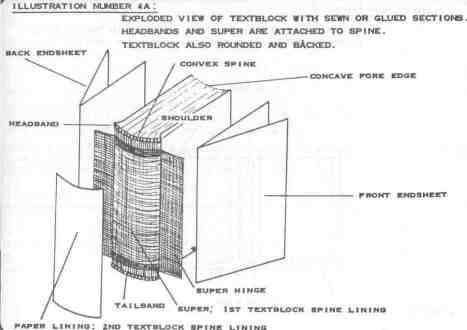
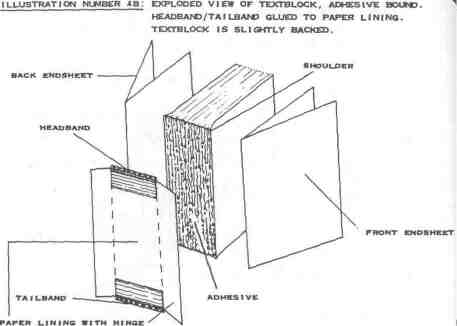
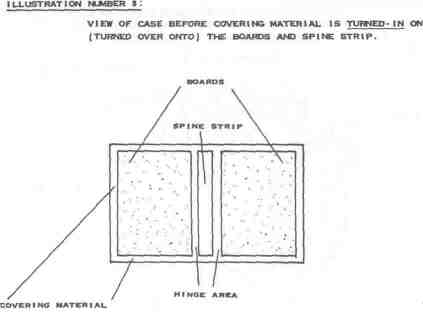
Book Repair Manual Robert J. Milevski OUTLINE Section 1. Book Structure and Book Problems Introduction Book Structure and Construction Book Problems Section 2. Book Repair Procedures Tightening the Hinges of a Hardback Book and Variation for Replacing Endsheets Recasing a Textbook into its Original Cover Replacing a Worn Spine with a New Buckram Spine Tipping Pages into Bound Volumes Section 3. Adhesive Binding: History, Causes of Deterioration, and Simple Book Repair Procedures Glossary Additional Readings Contents of the ICCP (Illinois Cooperative Conservation Program) Book Repair Kit, circa 1987 Book Repair Supplies and Suppliers Sources for Endsheet Paper and Light Weight Bristol Supplier's Addresses Adhesives: Instructions for Mixing, Diluting and Use Specifications and Supplies for the ICCP Book Repair Kits NOTE: Information on suppliers and pricing is from the 1980s. In most cases, the suppliers are still available, although the pricing has changed. 76 SECTION 1. BOOK STRUCTURE AND BOOK PROBLEMS Introduction This section will familiarize you with the parts of a book and how it is put together. It will also illustrate familiar deteriorated books in the collections of all libraries. The ICCP book repair workshops, for which this manual was developed, were designed to teach simple repair procedures to library staff to help them keep most of their book stock in use and in circulation for as long as it is needed. The glossary at the end of the manual defines the terms used throughout, including those terms that are underlined. Use this section of the manual to become familiar with the structure of most hardback books and with their typical repair problems. Each problem type that is illustrated is also related to a solution. The solutions are covered in the manual's sections on book repair procedures. Book Structure and Construction Most modern books are case-bound. The case (cover) and the textblock are constructed separately, although simultaneously, and then the two pieces are brought together and attached to each other with an adhesive. (See Illustration #3.) Let's examine these two components individually. Textblock (See Illustrations #4A & #4B.) The textblock of a book is a block of pages which are bound together. This block of pages is made up of either a group of folded sections or individual leaves. The sections or leaves are formed from large sheets of paper on which a sequence of pages are printed. Each sheet is then folded so that the pages are in correct order. This makes up a section. Individual leaves of text are formed when the folded edges of each section are cut off. Sections and leaves are sewn and/or glued together along the folded edge (of a section) or the fold-cut edge (of the individual leaves) (which has also been roughened by machine to more readily accept an adhesive). This edge is the spine of the textblock. Endsheets are then tipped-on to the front and back of the textblock at the spine edge. Next, the spine can be rounded and sometimes backed to form the convex spine and concave fore-edge typical of most books. Following this, a headband and a tailband and one or two spine linings are glued down to reinforce the spine. The endsheets and spine linings attach the textblock to its case. How the pages of a book's textblock are held together as a unit is vital to how well the textblock will open and to how well the textblock will hold its shape. Books whose sections are sewn through the folds and to each other are much superior to and operate more effectively than leaves of text held together with a layer of adhesive. (Adhesive binding is also commonly called perfect binding. Ironically, adhesive bindings are hardly "perfect" when the adhesive doesn't hold.) The leaves of a perfect-bound book can sometimes be removed almost as readily as sheets from a pad of paper. Case (See Illustration #5.) Also important is the method and materials used to attach the textblock to its case. (Later called "cover" once the casing-in process is completed.) The case is two pieces of heavy board (the hard covers), aspine strip (heavy paper or bristol that will hold the rounded shape of the book spine), and a covering material (book cloth, buckram, paper, etc.). The boards and spine strip are cut to specific measurements. They are glued down to the covering material at predetermined distances apart. These distances are critical. The case must cover the textblock precisely. The cover boards should lie flat and also hinge freely around the shoulder of the textblock. The cover spine should fit snugly over the textblock spine. The cover boards should form a 1/8" square around the top, bottom, and fore 77
78
79
80 edges of the textblock. The result is a cover which functions properly and which both encloses and protects the textblock. The points of attachment between textblock and case are the hinge areas. These are critical. Hinges have several purposes: the covers move (or open or turn) on them (more specifically the shoulder of the textblock), and they serve to hold the textblock into its cover. If quality materials are used and they are properly glued into place, the book will function very well, and the hinges will be strong. Alternatives to proper materials and workmanship are detrimental to the book. The result is hinge areas which are inherently weak. Combine this weakness with ordinary use and circulation and the textblock is soon loose in its cover, or the book has loose hinges. Book Problems Wear and tear on library books is not only inevitable, it is philosophically desirable since it is a definite indication that books are being used. Yet normal wear and tear incurred by frequent use, inadequate or poorly-made publisher's bindings, destructive handling practices (i.e., fore edge shelving, use of book drops/book returns, pulling books off shelves at the headcap, etc.), and poor environmental conditions are all contributors to book deterioration. Damage can be reduced in the latter two cases through staff and patron education, and by controlling environmental factors. Of course, frequent and damaging patron use of materials can be controlled by locking them up and restricting access: but this defeats the purpose of most libraries! There is no control, however, over increasingly poor quality publisher's bindings. In an effort to cut costs, some publisher's have eliminated elements which are critical to a proper binding: the use of super cloth in casing-in, sewn sections, rounding and backing, and even the hard-cover itself. Many mass-produced books are made as cheaply as possible and with inferior materials. All libraries are made aware of this if they count the number of deteriorated and broken books they have in their collections. At a commercial edition bindery, the case (cover) and the textblock of a hardback book are made in separate production lines and meet to be glued together in a final step termed "casing-in." The attachment of the case to the textblock is critical to its fulfilling its purpose of protecting the contents. This attachment can break down for a number of reasons, and it is not uncommon for a brand new book to arrive loose in its case, to become loose almost immediately, or to fall out of its cover entirely. Heavy books are a special problem because their bindings are not correspondingly stronger. The publishing industry does not design books for library use. In this example of brand new materials falling apart so soon after being produced, the cover of the book is still in mint condition, so a commercial rebinding is not yet warranted. While many libraries choose to have books in disrepair commercially rebound, there are several advantages to repairing in-house. It is less expensive to repair locally, the item is repaired more quickly and is not so long away from the shelves, and the undesirable effects of commercial binding have been avoided (i.e., loss of original covers, loss of folded sections, trimming of the textblock, oversewing which prevents the book from opening flat, etc.). Often books are rebound for purely cosmetic reasons, such as frayed edges or soiled covers. In decision-making, the important thing to keep in mind is whether the cover is serving its purpose of protecting the textblock. Frequently, a timely repair can prevent more serious damage from occuring. In this sense, book repair is a preventative maintenance technique. The exception is rare, unique or valuable items which are better left untreated or given over for proper treatment to a trained conservator, to ensure the artifactual integrity of each item. The following section will briefly explain and illustrate five major types of typical book problems which can be repaired in your library. Solutions are presented in abbreviated form for each problem. Detailed instructions for each solution are found in Section 2 and Section 3 of the manual. 81
82
83
84
85
86
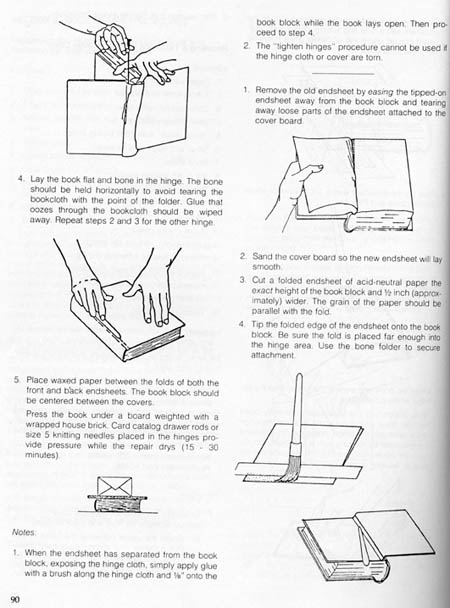
87 SECTION 2. BOOK REPAIR PROCEDURES Tightening the Hinges of a Hardback Book and Variation for Replacing Endsheets Materials: 1. Glue: polyvinyl acetate adhesive (PVA); 2. Empty detergent bottle; 3. Knitting needle, size 4 or 5 or card catalog drawer rods; 4. Waxed paper; 5. House bricks, wrapped in brown kraft paper; 6. Glue brush (1/4-1/2" wide); 7. Artist's oil painting brush (long thin brush with short bristles); 8. Pressing boards; 9. Bone folder. Wear and tear on library books is not only inevitable, it is philosophically desirable since it is a definite indication that books are being used. Unfortunately, disrepair is not only caused by ordinary use, it also results from inadequate or poorly-made publishers' bindings, fore edge shelving, and the use of book returns. Regardless of the reason, a simple book repair executed in time will eliminate the need for a time-consuming repair or an expensive rebinding later. At a commercial edition bindery, the case (cover) and the book block (text) of a hardback book are made in separate production lines and meet to be glued together in a final step termed "casing-in." The attachment of the case to the book block is critical to its fulfilling its purpose of protecting the contents. This attachment can break down for a number of reasons, and it is not uncommon for a brand new book to arrive loose in its case, or to become loose almost immediately. Heavy books are a special problem because their bindings are not correspondingly stronger. When books are caught at the point when they are merely loose in their cases, the repair is simple and inexpensive — the hinges can be lightened with an application of glue. If allowed to remain loose, a book will eventually work away from its center entirely. A simple procedure for tightening loose hinges is described and illustrated below. It can be done in less than five minutes with a few simple supplies. Procedure:
Approximate cost per item = $.30 Approximate time (for a pair) = 8 minutes. 1. Select for repair when a book is loose in the hing area.
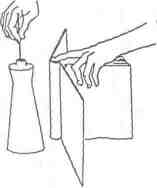
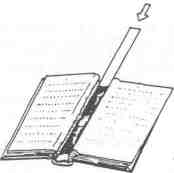
Place the book on its tail with the cover open. When the hinges are loose, the book block can be pressed away from the cover, exposing the inside of the hinges. Dip a size 4 or 5 metal knitting needle into a detergent bottle filled with glue. The needle should be coated completely with glue and the glue should drip slowly off the end of the needle. Dilute the glue with water to achieve the proper consistency.
Insert the needle into the hinge area between the backbone of the book block and the spine of the case, and roll it into the joint. Care must be taken to apply the glue only into the hinge area, or the book will not open properly. 88 5. Close the book and trim the excess width of the endsheet with a ruler and scalpel. A piece of cardboard placed under the endsheet while trimming will protect the book.
6. Glue up the endsheet with a 1:1 mixture of wheat starch paste and PVA.
7. Close the book and bone in the hinge. Use the flat edge of the bone folder. 8. While supporting the book block, carefully open the front cover so that the spine lays over the edge of the table and the hinge meets the rim. Smoothe the endsheet by rubbing with a soft cloth. Do not open the cover more than 140° or the endsheet will stretch, causing a crease in the hinge.
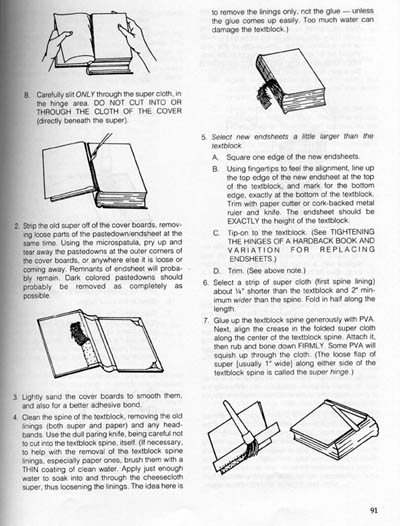
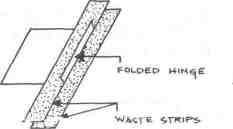
9. Repeat step 5 of Tighten Hinge Procedure. Recasing a Textblock Into its Original Cover Materials: 1. Paper cutter; 2. X-Acto knife and blades; 3. Cork-backed metal ruler; 4. Small sharp scissors; 5. "Book repair" knife [dull paring knife]; 6. Small and large glue brushes; 7. Bone folder; 8. #4 or #5 knitting needles; 9. Pressing boards; 10. Book Press (optional); 11. Alkaline pH endsheets; 12. Super (hinge cloth); 13. Light-weight, alkaline pH bristol; 14. Polyvinyl acetate adhesive (PVA); 15. Mixture of PVA and methylcellulose; 16. Waxed paper; 17. Strip of pressboard; 18. Waste paper strips. Problem: Textblock is detached or detaching from its cover at the inner hinges or, the endsheets and super are torn in the hinge area. Solution: Disbind textblock from the cover, if necessary. Remove worn or torn endsheets; remove super and spine linings from textblock. Replace with new, stronger components. Recase the textblock into the original cover. Approximate time = 30 minutes. Approximate cost = $.40 Procedure: 1. To release the textblock from the cover: (repeat all steps for front and back of book) A. Grasp the upper corner of the loose flyleaf. Pull it gently and slightly diagonally downward, easing it away from the textblock. This exposes the super cloth in the hinge area. 89
90
91
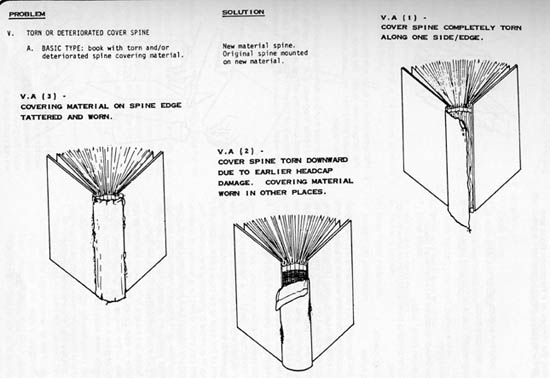
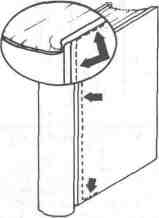
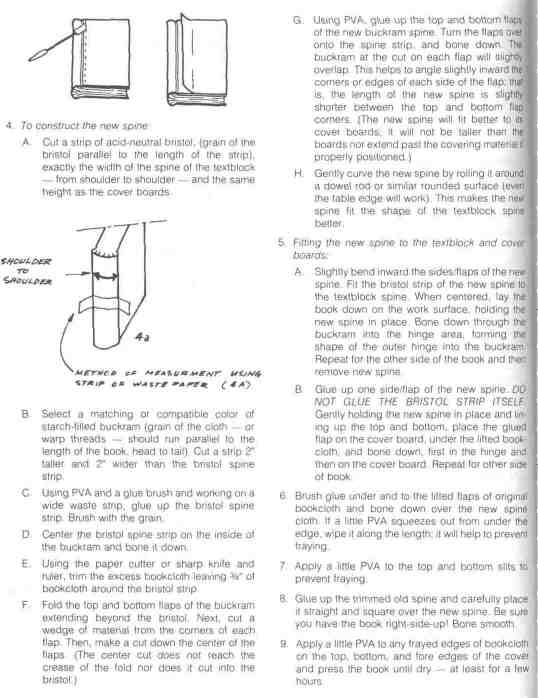
92 G. Procedure for stretched-out or unsquare pastedown/endsheet: If the pastedown/endsheet does stretch out or does not fit the cover board squarely, trim the excess along the appropriate edge — while still damp with adhesive — by LIGHTLY scoring it to size using a scalpel and a metal ruler. The piece should then pry up easily using the microspatula. Replacing a Worn Spine With a New Buckram Spine Materials: 1. Paper cutter; 2. Cork-backed metal ruler; 3. X-Acto knife and blades; 4. Small sharp scissors; 5. Paring knife; 6. Bone folder; 7. Small and large glue brushes; 8. PVA (polyvinyl acetate adhesive); 9. Starch-filled buckram; 10. Light-weight alkaline pH bristol; 11. Waste paper; 12. #4 or #5 single-pointed knitting needles; 13. Pressing boards or book press. Problem: Cover spine of book torn or deteriorated, either partially or completely, around outer hinges, headcap, or tail. Super (first textblock lining) is intact. Solution: Remove deteriorated spine and replace with a new spine made from matching or compatible buckram and lined with acid-neutral bristol board. Trim around author, title, and publisher information on old spine and attach in original position to new buckram spine. Approximate time = 20 minutes. Approximate cost = $.14 Procedure: 1. To remove the worn spine:
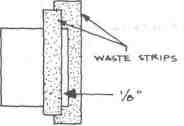
(repeat all steps for front and back of book) A. Place a metal ruler 1/16"-1/8" in from the outer hinge area, ON the cover board. It is important NOT to cut into or through the outer hinge, as this would damage the super and necessitate a more extensive repair. B. Cut firmly through the cloth, along the ruler, with the X-Acto knife. C. Again, with the knife, slit about 1" along the outside very top and bottom of the book boards. D. Using fingers or the paring knife, lift the old spine away from the book. The spine will still be attached at the tops and bottoms by the turn-ins which are usually made of bookcloth. Carefully cut these with small sharp scissors and the entire spine will lift away.
2. Clean off the old cover spine by peeling off the paper lining on the spine's inside. Trim off the frayed edges using the paper cutter or a metal ruler and knife. Save as much of the spine as possible. Also, score the cloth lightly three or four times with the knife or scalpel rather than trying to trim in one cut: the cloth can snag, cockle, bind, fray, or bunch-up if a heavy cut is tried; this causes a raggedy edge which will need to be trimmed again. 3. Firmly holding the microspatula level with the surface of the book, slide it 1" UNDER the bookcloth (where the 1" slit starts) and on TOP of the cover board. Pull it straight down along the book's length. This frees a 1" flap of bookcloth and exposes bare cover board. 93
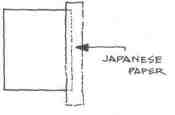
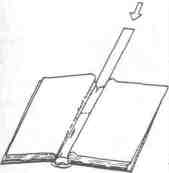
94 Tipping Pages Into Bound Volumes Materials: 1. Paper cutter; 2. Glue: polyvinyl acetate adhesive (PVA); 3. Japanese paper suitable for cutting into strips [Sekishu, Kizukishi, Goyu], 4. Waste paper; 5. Waxed paper; 6. Unbleached linen thread or heavy carpet thread; 7. Sewing needle; 8. Small glue brush [1/2" to 1"]; 9. Scalpel and blades or X-Acto knife; 10. Ruler; 11. Bone folder; 12. Scissors. Tip-ins are loose pages or groups of pages that must be inserted into volumes. Often they are errata slips, replacements for misprinted pages, an index or table of contents, or photocopied replacements for pages missing or torn or cut out of books. It is important that photocopied replacement pages have inner margins of at least 3/8 inch; if not, they will have to be recopied or guarded with a strip of Japanese paper. If replacement pages are copied on both sides, the text material should line up. Single sheets are easily tipped-in; however, judgement must be used when tipping-in a number of pages. If the inserted material is too thick, it will put strain on the binding and damage its structure. Materials too thick to be inserted should be rebound with the book or the entire item replaced. In some cases, it may be appropriate to bind the material separately and shelf it next to the book. Procedure for Tipping-In Single Sheets: 1. Determine if the textual material will fit into the book. If not, the sheet will have to be recopied or reduced to fit. 2. Place a ruler 1/4 inch in from the inside margin and crease the sheet upward against the ruler with a bone folder. If the margin of the sheet is less than 3/8 inch or if the inner margin of the book is less than 1/4 inch, see procedure for guarding below.
3. Place the fold of the hinge into the inner margin of the book and mark the sheet tor trimming on the top, bottom, and side. 4. Trim the sheet using a paper cutter or a ruler and scalpel. A piece of cardboard can be used as a cutting surface to protect the work table. 5. Place the creased hinge between two sheets of waste paper so that only the creased area is exposed for gluing.
6. Glue the hinge with PVA. [Too much glue is not desirable and will stick pages together or wrinkle the sheet.] 7. Position the folded edge of the glued hinge as far into the book's inner margin as possible. 8. Using a finger or the bone folder, rub the hinge to adhere it to the page. 9. Place waxed paper into the inner margin on either side of the tip-in to protect adjacent sheets from moisture/excess glue while drying. Procedure for Guarding Single Sheets for Tip-Ins: 1. Place the sheet to be tipped-in into the book and mark for trimming (if necessary) at the top and bottom. Use this procedure also for single folded sheets. 2. Trim the sheet using a paper cutter, or a scalpel and ruler. Cut a strip of Japanese paper (Sekishu) 1/2 inch wide and somewhat longer than the sheet. If the inner margin of the book is so narrow that the hinge of the tip-in will be over text, use the thinner Japanese paper (Kizukishi). 3. Place the tip-in sheet between waste sheets with approximately 1/8 inch of the inner margin showing. Glue the edge of the sheet with PVA. Remove the waste strips immediately and throw them away. 95
4. Place the edge of the Japanese paper strip over the glued area and rub with the fingers or a bone folder to secure the attachment. Place the glued hinge between waxed paper and under a flat board and light weight to dry.
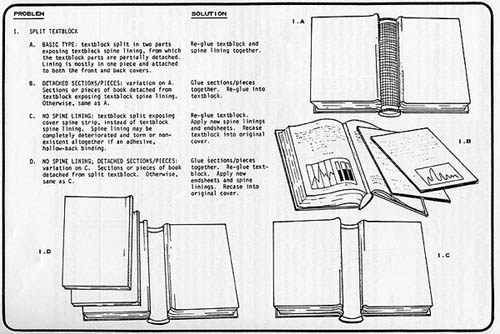
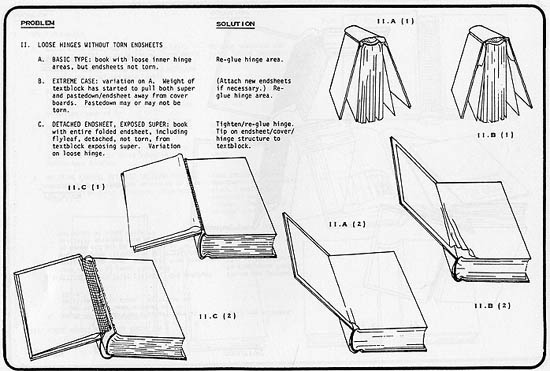
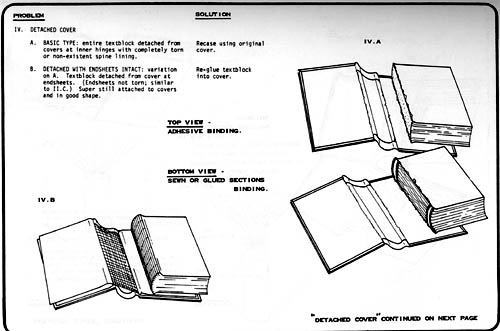
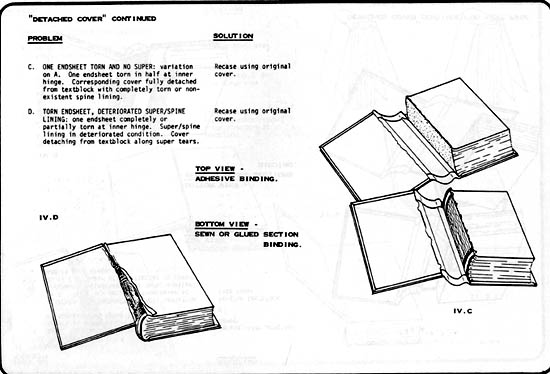
5. Trim the excess of the Japanese paper strip off the top and bottom and proceed to Step 2 of TIPPING-IN SINGLE SHEETS above. Procedure for Tipping-In Several Sheets: 1. If the inner margins of the replacement pages are at least 3/8 inch wide, place a ruler 1/4 inch in from the inner margin of the first sheet, crease the sheet upward against the ruler, and fold. If the inner margins are less than 3/8 inch, the sheets should be recopied with wider margins or a guard of Japanese paper added [see above]. 2. Place the sheets one on top of another with 1/8 inch of inner margin showing. The folded edge of the first sheet should be turned under. 3. Glue the exposed edges with PVA, separate the sheets, and lay them one on top of another with the inner margins lined up exactly. 4. Proceed to Step 3 of TIPPING-IN SINGLE SHEET! above. Procedure for Tipping-In Several Folded Sheets: 1. Remove the staples. Place the folded sheets into the book and mark for trimming (if necessary) on the top, bottom, and side. 2. Trim the sheets using a paper cutter or a ruler and scalpel. 3. Cut a hinge strip of Japanese paper (Goyu) 3/4 inch wide and the length of the sheets. 4. Fold the hinge strip in half and place it around the folded edge of the sheets. 5. Thread the needle with a piece of thread 2 1/2 times as long as the sheets. Starting in the inside and center of the folded sheets, sew the hinge strip to the sheets. Use 3 holes for short items and 5 holes for long items. End with a square knot. 6. Using waste strips to protect the item, glue-up the hinge strip and place the item as far back into the book as possible. 7.. Smooth the glued hinge with the fingers or a bone folder and place a piece of waxed paper on either side of the tip-in to protect adjacent sheets from moisture/excess glue while drying. 96 SECTION 3. ADHESIVE BINDINGS: HISTORY, CAUSES OF DETERIORATION, AND SIMPLE REPAIR PROCEDURES All adhesive bound books today are also case-bound books, except for paperback (softbound) titles (where the paperboard cover is glued directly to the textblock spine). An adhesive binding is one in which the sections or leaves of the textblock are held together as a unit with a layer of adhesive or glue, rather than being sewn, stapled, or otherwise attached. Case binding is that type of binding where the case (cover) and the textblock are manufactured separately and glued together in a final step called casing-in. Adhesive and case bindings came about as a result of the demand for books being greater than their supply. The publishers and edition binders, realizing the market, responded to the need by shortcutting traditional bookbinding procedures for the sake of greater volume and faster production. These mass-produced publisher's bindings deteriorate quickly. (Especially when tested against and subject to frequent and heavy library use.) Factors which contribute to premature binding breakdown are: weak or inferior materials being used in book production (causing loss of strength and durability); use of inadequate adhesives and glues which dry out over time and become brittle (as heard by the crackling sounds when a book is opened or when a textblock splits in two or more pieces): adhesives being applied too thinly, irregularly, or nonuniformly during the various gluing stages (which causes weak bonds between materials and subsequent loosening of materials — like a textblock detaching from its case, a split textblock, or an endsheet coming away from its cover board); too much adhesive being applied causing the bond between the materials to have greater strength than the materials themselves (causing breakdown or tearing of the materials along stress points—torn endsheets, split textblocks, etc.); elimination or shortcutting of materials and procedures during the book manufacturing process (such as the replacement of a cloth super with a paper one, or the total elimination of the spine linings — with the text-block being held together only by a layer of glue and attached to its case only by a set of endsheets); the case (cover) being too large for its textblock (causing the textblock to loosen or pull away from its cover because of too much play or free movement in the hinge area). All these factors contribute to the deterioration of adhesive bindings and casebound books. Adhesive bindings come in two categories: text-blocks made up of a group of single leaves (one shot, two shot double fanning), and those made up of a group of sections (perfo-, burst, or perfopunch). (Text-blocks of single leaves are really sections with their folds cut off.) ONE SHOT is the most commonly used technique in adhesive binding. The cut edge of the leaves (spine) is roughened. This increases the area being exposed to the adhesive for a better bond. Then a single layer of adhesive is applied to the spine. TWO SHOT has the same preliminaries as with one shot but two layers of glue are applied to the spine. The first is a thin adhesive primer which penetrates the roughened edge, deep into the paper fibers. The second layer, which is thicker and applied after the first is dry, reinforces the first adhesive layer. DOUBLE FANNING is the most durable adhesive binding. The textblock leaves are clamped, bent one way and an adhesive applied to the sides of every leaf, and immediately bent the opposite direction for a second application of glue. Properly executed, this process allows adhesive penetration between each leaf, thus tipping one leaf to another. PERFO-, BURST, and PERFOPUNCH bindings have sections which look like thread-sewn sections. Instead of being sewn, however, each section is held together by holes or slots which are perforated, burst, or punched-out along the fold, inside to outside. The advantages are that the folded sections stay intact and there is no time-consuming spine preparation or costly removal of paper. Adhesive is applied as with the two-shot method: first, thin primer to penetrate the slots of each section together; and second, a thicker layer is applied to the spine of the assembled text-block sections to bind them together as a unit. Although manufacturers publicize the quality of each of these adhesive methods, many bindings do not hold up under normal circulating library conditions and use. Even when given the same spine linings of cloth and paper which sewn sections receive, adhesive bindings cannot equal their strength, durability, openability, and shape retention. One major problem of adhesive bindings is the tendency of the spine to deform after several readings. Other than cutting off the glued edge of the textblock and repeating the adhesive binding, it is next to impossible to give shape back to the book. Another problem of modern adhesive bindings is the spine linings. Many do not stay attached to the textblock spine for very long, especially if the textblock splits! (The cause may be an insufficient application of glue, or paper linings improperly applied and 97 creased.) Many linings are also of inferior quality cloth, or simply paper. These often split and tear at the same time as the textblock. (Their weakness adds to the problem of split textblock because they cannot reinforce and strengthen the textblock spine.) Some adhesive bindings do not have any cloth or paper linings at all; only a layer of glue on the spine. These textblocks easily lose their shape when used and frequently split in half. Since they are only held in their cases by a set of endsheets, they become loose in their hinge areas, or tear out of their covers entirely. Of course, as adhesive bindings and casebound books are subject to the problems of premature breakdown, so also are there solutions to these problems. In most of the above example problems, the covers of the books are still in good condition, so a commercial rebinding may not yet be warranted. While many libraries choose to have books in disrepair commercially rebound, there are several advantages to repairing them in-house. It is less expensive to repair locally, the item is repaired more quickly and is not so long away from the shelf, and the undesirable effects of commercial binding have been avoided (i.e., loss of original covers, loss of folded sections, trimming of the textblock margins, sewing which prevents the book from opening flat, etc.). In decision-making, the important thing to keep in mind is whether the cover is serving its purpose of protecting the textblock. Frequently a timely repair can prevent more serious damage from occurring. In this sense, book repair is a preventative maintenance technique. The following section of this manual will illustrate typical adhesive binding problems and what to do to repair them. Adhesive Binding Problems and Repair Solutions Materials: Nearly all the contents of the book repair kit will be used in various grouping for the following repairs. Approximate Times: Five to thirty minutes per item Approximate Cost: Negligible — $.40 per item Note: Some adhesives used in publisher's bindings wil not bond well to the PVA (polyvinyl acetate) adhesive used in the following repairs. Problem 1: Split Textblock: Basic Type: Textblock split in two parts exposing textblock spine lining, from which the textblock parts are partially) detached. Spine lining is in good shape and attached to both the front and back covers. Solution 1, Basic Type: Reglue textblock parts and spine lining together. Procedure: 1. If the textblock parts are deformed — that is, they do not have their original square back or convex shape, or they will not fit together properly because of being out-of-shape — an attempt should be made to reform them before applying glue. Adhesives used on books are somewhat flexible but stubborn in their dry state. Try to reform the parts by bending or manipulating them in the direction opposite the deformity. PROCEDURE TO RESHAPE DEFORMED ADHESIVE TEXTBLOCK (not guaranteed to work for all books): A. Think of the deformed textblock leaves as being fanned in one direction. B. Grab textblock at fore edge with right hand. Bend textblock and fan leaves in direction opposite to deformity. Left hand provides support for this operation by resting on top of the textblock (to get the bend). C. Once the opposite fanning is completed, grip the textblock tightly with the right hand. Apply pressure with the left hand, especially the heel of the palm, at the top of the bend in the textblock, near the spine or hinge area. Pressure should be directed down (into the book) and to the right (toward the right hand). 98 D. Still gripping the textblock tightly with the right hand, let the leaves slowly resume their "normal" position, while applying pressure with the left hand. The purpose of this is to try to reshape the textblock spine to its original square back or convex spine shape. E. Pressure should be applied at the head, tail, and middle parts of the textblock along the bend to achieve uniform reshaping. F. Repeat steps B-E as needed to achieve the desired shape. Note: Remember that the original shape of the textblock cannot be reclaimed without extensive manipulation of the deformed textblock parts. 2. Once the reshaping operation is completed to your satisfaction, or if the textblock parts were not out-of-shape, glue can be applied. With a small glue brush and PVA, glue up the spine lining and the exposed spines of the textblock parts. Apply also a 1/8" strip of PVA along the inner margin of the parts where they will meet when realigned. 3. Line up textblock parts as squarely as possible and close the book. 4. Using the bone folder, press or bone down along the cover spine. If PVA oozes out at either the head or tail of the spine, wipe up this excess with a damp cloth. If not wiped up and the PVA dries, the textblock spine wil stick to the inside cover spine at the head and/or tail of the book. 5. Reform the textblock, if necessary, after boning, and place the book flat on a work surface with a weight on top. Insert a #4 or #5 needle or a card catalog drawer rod into each outer hinge, so the hinge retains its shape. Press. Let the book dry overnight, or several hours, at least. Problem 1, Variation A: Split Textblock; Deteriorated Super or Paper Lining, Missing Paper Lining: The same as the BASIC TYPE above except there is not a paper lining under the cheesecloth super lining. OR the cloth super, without a paper lining, is in a deteriorated condition — that is, there are holes or tears in it. OR paper is substituted for a cloth super, and it is in a deteriorated condition. Solution 1, Variation A: Insert a strip of scrap paper under the existing lining. This strip absorbs any adhesive leaking through the holes and tears in the lining during the gluing procedure, and becomes — in effect — the second spine lining. Otherwise, the textblock spine would stick to the inside of the cover spine. Procedure: 1. Cut strip of scrap paper (paper grain parallel to the length of the strip) to the approximate width and height of
99 the textblock spine. Do not cut the strip larger than the spine in either measurement. To cut, use ruler and scalpel on a pressboard surface. 2. Insert the strip between the spine lining and the cover spine, 3. To complete the repair, follow steps one to five of the previous procedure. Problem 1, Variation B: Split Textblock: Detached Sections/Pieces: The same as the BASIC TYPE above except the textblock has split into 3 or more parts, with one or more pieces detached from the textblock; similar to a book with loose pages. Solution 1, Variation B: Glue the detached pieces together into a block. Then, glue this block into the book. Procedure: 1. If detached parts are out-of-shape, try to reshape them. Also reshape the parts still attached to the spine lining, if necessary, 2. Glue detached pieces into a block by tipping them together with a 1/8" strip of PVA along the inner margins where they meet when realigned. Use a small glue brush. 3. Tip the block onto either one of the two textblock parts still attached to the cover. 4. To complete the repair, proceed as from Step 2 of Problem 1, Basic Type. Problem 2: Split Textblock: No Spine Lining: Basic Type: Same as Problem 1, Basic Type, except that the textblock is split exposing the inside cover spine strip, rather than the textblock spine lining. The spine lining may be completely deteriorated and torn or nonexistent altogether. Solution 2, Basic Type: Disbind the textblock parts from the cover and glue the parts together. Recase the textblock — with new endsheets and spine linings — into its original cover. Procedure: 1. Disbind or release the textblock parts from the cover. When there is no spine lining, this can be done by easing and pulling the flyleaf/endsheet away from each textblock part. Each part should then be free. If there is a spine lining which has split, ease the flyleaf/endsheet away from the textblock part to expose the super or lining. Jake the scalpel and cut through the lining from head to tail to free the textblock part. 2. Reshape each textblock part if out-of-shape and then reglue or tip them together as a block or unit. 3. To complete the procedure, refer to handout Fiecasing a Textblock Into its Original Cover. Problem 2, Variation A: Split Textblock: No Spine Lining; Detached Sections/Pieces: The same as Problem 2, Basic Type above, except the textblock has split into three or more parts, with one or more pieces detached; similar to a book with loose pages. 100 Solution 2, Variation A: Disbind the textblock parts from the cover. Glue all the detached pieces together into a block. Recase the textblock — with new endsheets and spine linings — into its original cover. Procedure: 1. Proceed as with Problem 2, Basic Type, with the addition of gluing all the detached pieces into one block. Problem 3: Loose Hinges Without Tom Endsheets: Basic Type: Book with loose inner hinge areas., but its endsheets are not torn. Solution 3, Basic Type: Refer to handout — tightening hinges of a hardback book & variation for replacing endsheets. Problem 3, Variation A: Loose Hinges Without Torn Endsheets; Extreme Case: Weight of the textblock or mishandling has pulled both the super and pastedown/endsheets away from the cover boards. The pastedown/endsheet may or may not be torn. Solution 3, Variation A: Refer to Problem 3, Basic Type solution with the addition of gluing the pastedown/endsheets back to the cover boards with the 1/4" long-handled brush. If the endsheets are too deteriorated, but the super is intact, replace with new endsheets. Problem 3, Variation B: Loose Hinges Without Tom Endsheets: Detached Endsheet, Exposed Super: Book with entire folded endsheet, including flyleaf, detached (not torn) from the inner hinge area and textblock, exposing the super. Solution 3, Variation B: Apply glue into the hinge area and tip on the endsheet. Procedure: 1. Reshape the textblock if necessary. 2. If the super or paper lining is deteriorated and torn (with holes in it), or the cheesecloth super is missing a paper lining, cut and insert a scrap paper strip between the super and the inside cover spine. Refer to steps 1-2, Solution 1, Variation A. 3. If the super is pulling away from the spine, apply 1/8" strip of glue along the textblock shoulder and tip on the endsheet (while closing the cover board). Use a small glue brush. 4. Using the bone folder, bone into the outer hinge and bone along the cover spine. Remove any excess adhesive with a damp cloth. 5. While supporting the book, carefully open the cover so that the spine lays over the edge of the work surface and the outer hinge meets the surface edge. Smooth the inner hinge by rubbing it with a dry textured paper towel or cloth. 101 6. Place a piece of waxed paper in the inner hinge to prevent the two halves of the endsheet from sticking together at the inner hinge. 7. Press the book under a weight to dry, with knitting needles or card catalog drawer rods laid into the out hinges. Problem 4: Loose Hinges With Torn Endsheets; Basic Type: Book with endsheet torn at the inner hinge. The super is exposed but in relatively good shape. Solution 4, Basic Type: Refer to handout — tightening the hinges of a hardback book & variation for replacing endsheets. Problem 4, Variation A: Loose Hinges With Torn Endsheets; Detached Super/Spine Linings: One endsheet torn in half at the inner hinge and the corresponding cover separating or separated from th textblock. Spine linings are still attached to the cover and may be completely or partially detached from textblock spine. Solution 4, Variation A: Tip-on new endsheet. Reglue spine lining and textblock spine. Glue up the pastedown/endsheet. Procedure: 1. Remove the flyleaf/endsheet from the textblock by easing and pulling it away from the textblock shoulder 2. Remove loose or torn pieces of pastedown/endsheet, along the inner hinge tear, by pulling it away from the cover board. DO NOT pull up the super hinge. 3. Reshape the textblock if necessary. 4. Apply a new endsheet to the textblock. Refer to tightening hinge handout for procedure. 5. If the super or paper lining is deteriorated and torn (with holes in it), or the cheesecloth super is missing paper lining, cut and insert a scrap paper strip between the super and the inside cover spine. Refer to ste 1-2, Sol. 1, Var. A. 6. Generously glue up the textblock spine. Use 1" round glue brush. 7. Glue up the pastedown/endsheet. Use 1" round glue brush and PVA/methylcellulose "mixture" (2:3). Brush with the paper grain. 8. Close the book cover. Bone in the outer hinge and along the cover spine using the bone folder. Wipe up any excess glue at the head and tail of the spine with a damp cloth. 9. While supporting the book, carefully open the cover so that the spine lays over the edge of the work surface edge. Smooth the inner hinge by rubbing it with a dry textured paper towel or cloth. 10. Place a piece of waxed paper between the folded endsheet and into the inner hinge to prevent the pastedown moisture from cockling the flyleaf. 11. Press the book under a weight to dry, with knitting needles or card catalog drawer rods laid into the outer hinges. 102 Problem 5: Detached Cover: Basic Type: Entire textblock completely detached from covers at inner hinge with completely torn or nonexistent spine linings. Solution 5: Recase textblock — using new spine linings and endsheets — into original cover. Refer to handout recasing a textblock into its original cover. Problem 5, Variation A: Detached Cover; Detached With Endsheets Intact: Textblock detached from its cover at endsheets. Endsheets not torn. Similar to Problem 3, Variation B. Solution 5, Variation A: Reglue the textblock into its cover. Procedure: 1. Reshape the textblock if necessary. 2. If the super or paper lining is deteriorated and torn (with holes in it), or the cheesecloth super is missing a paper lining, cut and insert a scrap paper strip between the super and the inside cover spine. Refer to steps 1-2, Solution 1, Var. A. 3. Generously glue up the spine and shoulders of the textblock. 4. Fit and square-up the textblock into its cover. Attach or tip-on the endsheets (still attached to the cover) as accurately as possible, to the textblock. 5. Follow procedures 4-6, Solution 3, Variation B. Problem 5, Variation B: Detached Cover; One Endsheet Tom and No Super: One endsheet is torn in half at the inner hinge. Corresponding cover board is fully detached from the textblock with completely torn or nonexistent spine linings. Solution 5, Variation B: Disbind or release the textblock from its cover. Treat as Problem 5, Basic Type, above. Problem 5, Variation C: Detached Cover With Torn Endsheet and Deteriorated Super/Spine Lining: One endsheet is completely or partially torn at the inner hinge. Super/spine lining is in a deteriorated condition. Cover is detaching from the textblock along the deteriorated super. Solution 5, Variation C: Disbind or release the textblock from its cover. Treat as Problem 5, Basic Type, above. 103 Problem 6: Tom Headcap: Basic Type: Book with torn or completely pulled off headcap. Solution 6, Basic Type: Refer to handout — replacing a worn spine with a new buckram spine. GLOSSARY Many terms used in book publishing, bookbinding, book repair, and book conservation are not standardized. Each discipline has its own nomenclature for the same parts (or processes in the manufacture) of a book. Rarely are the terms the same from discipline to discipline. Many are, however, interchangeable. Other terms used by some or all may have radically different meanings or connotations. For the purpose of this manual, the main descriptive terms employed are those felt to be the most familiar/generic to library staff and others having book collections. Consult the main entry in the glossary for alternate terms. Adhesive Binding — a type of binding in which single leaves are secured together solely with an adhesive applied to the textblock spine. Animal glues, polyvinyl acetate glues, and hot-melt adhesives are mostly used. Sometimes called a perfect binding. Sections with perforations along the folds (for adhesive penetration into the folds to hold each section together) is a type of adhesive binding. It is known as perfo-, burst, or perfopunch binding. Back Cover — that part of the book cover (case) following the endmost leaves and fly leaf/endsheet. Backed Book or Backing — backing is the hammering or manipulation of the folds of the glued-up sections or leaves of a textblock to form shoulders to accommodate the thickness of the cover boards. This is normally done after rounding, in an operation commonly referred to as rounding-and-backing. In some flat back or square back bindings, there is a swell along the textblock spine. This swell, making the spine edge thicker than the fore edge, is due to thread in the folds (as in sewn sections) or adhesive between the leaves (as in double fanned binding). If the textblock is pressed in slightly and manipulated just below and along the spine edge, an "artificial" shoulder is created, but which is not as permanent as the shoulder of a properly rounded and backed book. Boards — a general term used for pasteboard, millboard, strawboard, etc., all of which are used to, form the foundation for book covers. They are made of various pulped or laminated fibrous material pressed into large, flat sheets, which are then cut to size and covered with cloth, leather, paper, or other materials, to form the book covers. Also called cover boards, or book boards. Book Cloth — specially prepared cloth material used as a covering material for book covers. A thin, woven cloth (like muslin) that has been dyed, filled, impregnated or coated with some compound, and subjected to heat and pressure. Book cloth falls into three main categories: starch-filled (where the spaces in the cloth weave are filled with starch, sometimes called sized book cloth), acrylic-, pyroxylin-, or vinyl-impregnated (where these compounds fill the spaces in the cloth weave, as with starch-filled), and plastic coated. Book cloth is lighter weight than buckram and is available in a range of grades and colors. Bottom Edge — the bottom portion of a page or cover. Bristol — thin paperboard with a smooth surface suitable for writing and printing. Used for lining the spine of a case. Index cards are made of bristol. Also called bristol board. Buckram — a heavy-weave cotton cloth filled, impregnated, or coated with different compounds (mainly, starch and pyroxylin but also other materials) to enhance body, finish, and durability. Buckram is heavier than book- cloth and is available in a range of grades and colors. Case — a cover, assembled by hand or machine, consisting of two boards, a spine strip, and covering material (cloth, leather, paper, etc.). The case is made separately from the textblock and later attached to it in a step called casing-in. Case Binding — a method of binding in which the book case (cover) is made separately from the textblock and later attached to it. (As distinguished from leather bindings where the cover is assembled on the book.) The textblock is attached to its case 104 by means of super hinge, endsheets, and an adhesive. Casing-In — the process of pasting and attaching a finished textblock into its case (cover). Cloth — term loosely used for a woven material that covers the boards of a case; a fabric thinner than buckram. See also book cloth. Coated Paper — paper surfaced with white clay or a similar substance to provide a smooth surface for printing detailed illustrations. The finish is often glossy but can be dull. Also known as art paper. Cover Spine — the space between the boards of a case to accommodate the thickness of the text-block. The inside of this space is stiffened with a spine strip, usually bristol. A hinge area left on either side of the spine strip allows for the movement of the cover boards on the shoulders of the textblock as the book is opened and used. The outside part of the cover spine usually receives stamping for author, title, and publisher. Also called spine, backbone, back, backstrip, and shellback. Covering Material — paper, leather, book cloth, buckram, synthetic book cloth, etc., used as an outer covering on hardback books or protective boxes. Disbind — to release the textblock from its cover by easing the tipped-on endsheets away from the textblock and by slitting the super with a sharp knife or scalpel. Double Fanned Adhesive Binding a type of adhesive binding where the back margin of each leaf in an unglued textblock is exposed 1/16" or less for an application of adhesive. The margin is exposed on both sides of each leaf by clamping the textblock on a vise-like press and then pushing against the text-block, first in one direction, then the other, thereby fanning or separating the edges of the leaves. Endsheet or Endsheets — a single folded sheet of paper tipped-on at the front and back of the text-block, one leaf of which is pasted down to the inside of the cover board to form the pastedown. The other leaf forms the flyleaf, and the fold connecting the two leaves usually forms part of the inner hinge of the book. The endsheets, together with the super hinges, serve to secure the textblock to its case. Also called endpaper or endpapers. Flat Back Book — a casebound book which has not been rounded or backed, also called square back. Flyleaf — the leaf (or leaves) forming that part of the folded endsheet not pasted down to the inside of the cover board. Its function is to protect the first or last leaves of the textblock. See also Pastedown. Fold — a bend in any flexible material, such as paper, made by turning a sheet over upon itself — as to fold in half. Folder — a small, hand-held tool (formerly made of bone, but now more often of plastic), more or less knife-shaped, used to form a smooth crease in the folded edge, and for many other binding processes. Folds — the fold along the backs of sections through which they are sewn, stapled, glued, or otherwise fastened to each other. Also called back folds. Fore Edge — the outer edge of a page or cover of a book opposite to and parallel with the spine. Front Cover — that part of the book cover preceding the foremost leaves and flyleaf/endsheet. Also called front board. Grain — the direction in which the majority of the fibers lie in a piece of paper or board. The grain in cloth is in the direction of the warp thread. Grain direction in all man-made materials used in bookbinding must run from head to tail of the book; this to prevent warping, for easy opening and flexibility, and to avoid buckling or mousetrapping, as when the book snaps shut. Gutter — the channel and combined marginal space formed by the two inner or back margins of facing pages of a volume. Head — the top edge of a volume or page: by extension, the top portion of the cover spine (also text-block spine) of a bound volume. See also tail. Headband — a small ornamental band, generally of mercerized cotton or silk, which, in most modern publisher's trade bindings, is glued on the head as well as the tail of the textblock spine of a book. Modern headbands imitate the sewn-on headbands that functioned to protect the head and tail of early bindings. The band at the tail of the book is sometimes called the tailband; although now both bands are usually called the headbands. Headcap — the covering material that has been shaped over the headband and tailband at the head and tail of the cover spine of a book. At one time differentiated from the tailcap; although both are now referred to as headcaps. Hinge — the flexible part of the cover on which the boards swing open See also inner hinge and outer hinge. Hinge Area — the part of a binding (both opened and closed) where the textblock joins its cover (case). 105 Hollow — that part or space of a case binding between the textblock spine and the inside of the cover spine. Inner Hinge — the fold of the channel lying between the two halves of an endsheet where the textblock is attached to its cover (case). Also called front hinge and inner joint. Japanese Tissue — a soft, strong, slightly transparent, long-fibered, and absorbent paper made from the fibers of a variety of plants common to Japan, especially the mulberry. It is available in a variety of thicknesses and colors. It is a very versatile paper, and according to the thickness used, it can be employed for patching leaves, for overall lining of leaves as a reinforcement, for mending tears, for reinforcing the folds of sections, or for mending inner hinges. Kraft Paper — a strong brown machine-made paper widely used for wrapping purposes, and in publisher's bindings for lining the inside cover spine (spine strip) of a casebound book. Leaf — a single sheet in a book containing two pages, one on each side. Library Binding — reinforced hardcover binding particularly suitable for books receiving heavy use. Used on the rebinding of new or used volumes, prebinding of new volumes (also called prebounds, prebinds, and pre-library bound), and binding of periodicals, as distinguished from publisher's edition binding, library edition binding, or other binding. Linings — layers of cloth (super) and paper used for reinforcing and stiffening the textblock spine. One or two layers of material are frequently glued to the textblock spine after it has been rounded and backed. Super is usually the first spine lining, and the second lining is a strip of light weight paper, called a paper lining. In some modern publisher's bindings super may not be used at all (or be of an inferior quality), with only a paper lining being glued down. In many publisher's adhesive bindings, linings may not be used at all: the textblock is not reinforced at all and is held together simply with a layer of glue. Ideally, textblock spine linings should reinforce the glue and help hold the sections together.
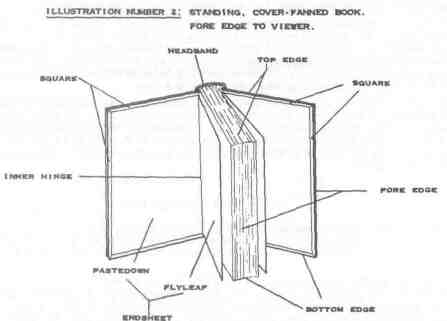
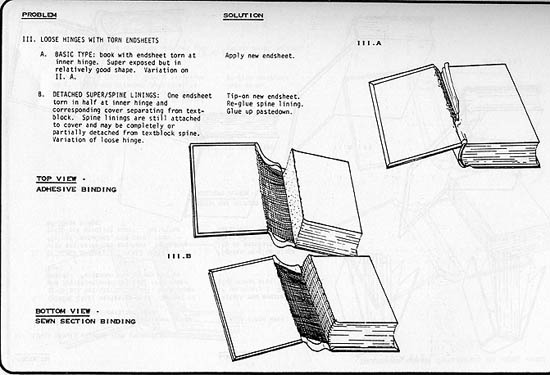
Loose Hinges — describes a casebound book whose inner hinges have become weak or torn; also describing a more serious problem where sections or the entire textblock is badly loosened from its cover (case) resulting in both endsheet and super damage. Also called shaken or loose in binding. Margins — the space around the edges of a page outside the printed or written matter. The four margins are commonly designated as; head or top margin; tail, lower or bottom margin; fore edge, outer or outside margin; and back, inner, inside, or gutter margin. Mending — minor restoration; realigning the edges of an item that has torn — usually by adding support not native to the object such as a strip of paper or cloth. See also repair. Methylcellulose — a grayish white, fibrous powder. Swells in water to a viscous solution. Used as an adhesive in book mending and repair. Outer Hinge — the flexible channel of covering material (paper, leather, cloth, etc.) on the outside of a book on which the cover board opens; the space between the cover boards and the shoulder of the textblock spine in which the covering material impressed. Also called French joint or French groove, joint, hinge, groove, gully, channel, and outer joint. Page — one side of a leaf of a book. Paper Lining — the second textblock spine lining (attached after the super); helps to reinforce the glue and super. In some modern publisher's bindings, paper is used in place of super giving a much weaker and inferior hinge. Can be a medium weight (kraft paper) or light weight paper. Pastedown — that half of an endsheet which is pasted to the inside of the cover board. Also called board paper, end lining, and lining paper. Perfect Binding — a type of adhesive binding in which the back folds of the sections are cut off, roughened, and covered with a layer of flexible glue, instead of being sewn or stapled: a cheap form of binding used for many kinds of books. Publisher's Binding — the kind of bookbinding that is furnished to the book trade, i.e., quantity binding in uniform style for a large number of copies of single titles. Also called edition binding. PVA (Polyvinyl Acetate) — an emulsion adhesive: a flexible adhesive that dries quickly and is considered permanent. Results in a very strong bond. Rebacked — describes a volume repaired by replacing the old cover spine with a new one. Rebinding — giving a book a completely new binding, including resewing or reattaching the leaves, attaching new endsheets and textblock spine linings, and constructing a new case (cover). Recasing — reattaching a textblock into its original cover, or into a new case. In the procedure the sewing or method of page attachment is not disturbed, 106 although new spine linings are applied. Repair — to remedy damage done to an item, usually by adding new material to replace damaged or deteriorated material. See also mending. Rounded Back Book — a book whose textblock spine has been given a convex form by rounding and backing. Rounding — the hammering or manipulation of the textblock spine into a convex shape (and subsequently the textblock fore edge into a concave shape) preparatory to backing. Rounding diminishes the effect of swelling caused by the thickness of the sewing threads or the application of glue from an adhesive binding. It also helps to prevent the textblock spine from falling into a concave shape after years of use or of standing upright on a shelf. See also backing. Scalpel — a small, straight knife sometimes made with thin changeable blades of various shapes. Used primarily in surgery, it is also a useful cutting tool for precise bindery work. Section— a folded, printed sheet forming and treated as a single binding unit. A section commonly has sixteen or thirty-two pages, although any multiple of four is possible. Sometimes called gathering, quire, or signature. The term signature really refers to the mark placed on the bottom of the first page, or on the outside fold of the section, for the convenience of the binder when the sections are gathered together for binding. Shoulder — the outer edge of the curved (rounded) textblock spine against which the cover board fits. The shoulder is made when a book is rounded and backed. Also called ridge, butt, flange, groove, abutment, and ledge. Spine— to avoid confusion because of various terminology referring to similar but different parts of the book, we have differentiated between the spine of the cover (cover spine) and the spine of the textblock (textblock spine). Spine Strip — a piece of stiff paper (kraft paper) or bristol that is attached to the inside of the case between the cover boards and which corresponds to the size of the textblock spine. Besides stiffening the covering material, the spine strip helps the cover spine retain its shape. Also called stiffener, inlay, and backlining.
Squares — the margins of a cover of a book which extend beyond the pages and protect them. When a book is cased-in equal margins of cover are formed on the top, bottom, and fore edges. Also called overhang. Starch Paste — an adhesive made from wheat or rice starch mixed with water. Will last only two or three days without refrigeration. Paste for bookbinding and conservation purposes usually contains a substance to discourage infestation by insects. Super— an open-weave variety of coarse, sized fabric, usually muslin or something looking like cheesecloth, used for reinforcing or stiffening the textblock spine of a casebound book. The super forms the first spine lining on the textblock. The excess (super hinge) that extends (usually one inch) beyond the edges of the textblock spine is used to attach the textblock into its case. Also called mull, crash, and gauze. Super Hinge — the part of the super that extends beyond the edges of the textblock spine (usually 1") and is used to attach the textblock into its cover (case). Tail — the bottom portion of the cover spine of a bound volume. Also called foot. See also head. Tailband — see headband. Textblock — the main block of sections or leaves, including endsheets and spine linings, which is bound together and then attached to the case (cover). Also called book block and body of the book. Textblock Spine — the back or folded edges of a group of sewn sections or the glued back edge of a block of leaves of an adhesive binding. And whether flat backed or rounded and backed, usually glued and lined with cloth and paper (super and paper linings). Also called spine, back, and backbone. Tip-In, Tipped-In, or Tipping-In — the attachment of one leaf to another in a book at or near the binding margin by means of a narrow strip of adhesive along the folded edge. Tip On — the attachment of endsheets (along the folded edge) to the front and back of the textblock at the shoulder by means of a narrow strip of adhesive along the folded edge. Top Edge — the top portion of a page or cover. Turn In — that part of the covering material which is turned over the outer edges of the boards (and spine strip) from the outside to the inside. Also called turn-over and overlap. ADDITIONAL READINGS Banks, Paul N. "Education in library conservation." Library Trends 30, 2 (Fall 1982): 189-201. Historical 107 discussion of conservation education and description of Columbia University's new preservation administrator and conservator programs. Berger, Pearl. "Minor repairs in a small research library." Library Journal 104, 12 (June 15, 1979): 1311-17. (LJ Series on Preservation, No. 3). Discussion of the organization, staffing, and scope of an in-house repair workshop, including what kind and complexity of repairs are appropriate; who will do the decision-making; and staffing, equipment, and materials needed. Boehm, Hilda. "Regional conservation services: what we can do for ourselves." Library Journal 104, 12 (July 1979): 1428-31. (LJ Series on Preservation, no. 5). Outlines practical, specific conservation activities libraries should undertake despite the sometimes overwhelming aspects of the problem. Darling, Pamela W. "Our fragile inheritance: the challenge of preserving library materials." The ALA Yearbook. (Chicago, American Library Association, 1978), pp. xxxi-xlii. Excellent overview of the preservation problem — issues, attitudes, and progress. Greenfield, Jane. Books: Their Care and Repair. New York, NY: H.W. Wilson Company, 1984. Includes simple illustrated procedures for book repair. Contains an especially useful description of the arrangement of a worktable suitable for small libraries. Horton, Carolyn. Cleaning and Preserving Bindings and Related Materials. Chicago: American Library Association, 1969. Second edition revised. Includes specific procedures and techniques in the reconditioning, repair, and protection of library materials, especially useful guidance for refurbishing projects for special collections of books. Kyle, Heidi, et. al. Library Material Preservation Manual. New York, NY: Nicholas T. Smith, 1983. Includes a series of simple, clever enclosures that can be constructed by the novice. Good introductory sections on working tips. Morrow, Carolyn Clark. Conservation Treatment Procedures: A Step-by-Step Manual of Procedures for the Maintenance and Repair of Library Materials. Littleton, CO: Libraries Unlimited, Inc., 1982. A collection of procedures — simple to complex — for book repair, maintenance, and protective encasement. The introduction discusses treatment options and organization. Appendices list equipment, tools, and supplies and include several managerial techniques. Includes a glossary and annotated bibliography. Morrow, Carolyn Clark. The Preservation Challenge: A Guide to Conserving Library Materials. White Plains, NY: Knowledge Industry Publications, Inc., 1983 Overview of the state-of-the-art of library preservation. Includes a chapter of case studies of conservation treatments for rare items. Patterson, Robert H. "Organizing for conservation: model charge to a conservation committee." Library Journal 104, 10 (May 15, 1979):1116-19. (LJ Series on Preservation, no. 2). Lists specific areas for a conservation committee to address and examine as the first step in developing a rational program for the whole library. Walker, Gay. "Library binding as a conservation measure." Collection Management 4, 1-2 (Spring-Summer 1982):55-71. Discussion of the conservation aspects of library binding. Includes specific information on considerations for decision-making, binding options, and quality. CONTENTS OF THE ICCP BOOK REPAIR KITS 1 - Cork-backed metal ruler 1 - Surgical scissors 1. - Small paste brush 1-1" round glue brush 1 - 1/4" artist's long-handled painting brush 1 - 8" tappered bone folder 1 - X-Acto Knife handle 5 - X-Acto Knife blades 1 - "Book" (paring) knife 5 - #4 single pointed knitting needles 1 - Empty 16 oz. plastic carafe bottle, 81/2" tall 1 - Small sanding block with refills of extra-fine flint sandpaper 1 - #2 pencil 1-4 oz. methylcellulose in a Ziplock bag 2 -16 oz. plastic carafe bottles filled with undiluted polyvinyl acetate 2 - Empty 16 oz. wide mouth plastic jars for holding prepared adhesives 4 - Strips of acid-free blotter in 2 sizes, 3" x 10" and 3" x 5" 32 - Sheets of light-weight bristol in 3 sizes, 8" x 8", 8" x 10", and 8" x 12" 1 - Half-sheet Kizukishi Japanese paper 44 - Folded alkaline pH endsheets in 3 sizes, 6" x 9", 7" x 10", and 9" x 12" 1 - Pressboard strip, 3" x 12" 1 - Half-yard of super cloth 6 - Colors of starch-filled buckram bookcloth, 1/3 yard each color 1 - Pressing board of AA 1/4" birch plywood, 9" x 12" 2 - Handi-Wipes 10 - Terri-Towels (textured paper towel) 108 1 - Stack of waste paper strips 1 -3/4" "hinge measuring strip" of thick bookboard 1 - Gallon Ziplock bag to hold small tools and supplies 1 - ICCP Book Repair Manual BOOK REPAIR SUPPLIERS & SUPPLIERS TOOLS AND MATERIALS Expendable Supplies and Materials: Blotter, acid-neutral — BookMakers; Light Impressions; University Products, photographic supply stores Light bristol, or heavy-weight paper — A/N/W; Process Materials; University Products Buckram, starch-filled — BookMakers; Joanna Western, Holliston Endsheet paper — See "ENDSHEET PAPERS" Hanoi-Wipes — Discount, grocery, and hardware stores Methylcellulose or wheat paste — BookMakers; Light Impressions; University Products Polyvinyl acetate adhesive (PVA) — Aabbitt Adhesives; Aikos; Gaylord; DEMCO (only Aabbitt and Aikos glues are known to be permanent) Sandpaper, extra-fine — Hardware and paint stores X-Acto knife blades, scalpel blades, #25 — BookMakers; Brookstone; Talas; Dick Blick; art supply stores Kizukishi (Japanese paper) — Aiko's; A/N/W; BookMakers; Light Impressions; University Products Super (hinge cloth) — Gane Brothers and Lane, or fabric stores (woven interfacing) Textured paper towels — Discount and grocery stores Tools: Artist's oil painting brush,1/4" — Art supply stores and discount stores Bone folder — BookMakers; Light Impressions; Gane Brothers and Lane; University Products Book press — BookMakers; Gaylord; Gane Brothers & Lane Book knife (paring knife) — DEMCO; Brodart; discount stores Cork-backed metal ruler — Brodart; DEMCO;
Gaylord; University Products; art supply stores and office supply stores Glue and paste brushes — Brodart; DEMCO; Gaylord; BookMakers; Talas; Gane Brothers & Lane Knitting needles, #4 or #5 — Yarn shops and discount stores Pressing board — Lumber yard; carpenter shop; Gane Brothers & Lane Paper cutter (paper trimmer) — Brodart; DEMCO; Dick Blick; Gaylord; Gane Brothers & Lane Sand paper holder — Hardware and paint stores Scalpel handle (#25) or X-Acto knife handle, BookMakers; Brookstone; surgical and scientific suppliers; art supply stores Small sharp scissors — Brookstone; fabric stores; surgical suppliers Miscellaneous Supplies: Containers for holding adhesives — Discount stores (plastic food storage containers) House brick wrapped in Kraft paper — Building supply Waxed paper — Grocery stores Scraps of cardboard or pressboard Waste strips of paper 3/4" strip of heavy cardboard SUGGESTIONS FOR SOURCES OF ENDSHEET PAPER AND LIGHT WEIGHT BRISTOL Endsheet Paper: 1. Andrews/Nelson/Whitehead OR BookMakers (a distributer of A/N/W) Mohawk Superfine Text, 70 Ib. (.006" thick) color: white/softewhite/ivory sizes: 23 x 29; 23 x 35; 25 x 38; 35 x 45 minimum order 100 sheets; available in full cartons of 1500, 1,000, and 500 sheets respectively. 2. Process Materials Corporation Archivart Standard, 80lb. (.007" thick) color: white only sizes: 25 x 38; 40 x 30 available in multiples of 100 sheets or full cartons of 500 sheets. 3. University Products a. Alpha-Cellulose color: ivory only 109 sizes: 8 1/2 x 11; 17 1/2 x 22; 32 x 40 available in multiples of 100 sheets. b. Perma/Dur Ledger, 80 Ib. (.006" thick) color: cream only sizes: 8 1/2 x 11; 11 x 17: 23 x 35 available in multiples of 100 sheets. Light Weight Bristol (for spine strips): 1. Process Materials Corporation Archivart Heavy Duty Library Endleaf, 100 Ib. (.008" thick) color: natural white sizes: 26 x 40 minimum order one carton (300 sheets). 2. University Products Library Bristol, .008" thick color: cream only sizes: 30 x 40 available in multiples of 100 sheets. SUPPLIERS' ADDRESSES Aabbitt Adhesives 2403 North Oakley Chicago, IL 60647 (312) 227-2700 Aiko's 714 North Wabash Avenue Chicago, IL 60611 (312) 943-0745 Andrews/Nelson/Whitehead 31-10 48th Avenue Long Island City, NY 11101 (212) 937-7100 [$100. minimum] BookMakers 2025 Eye Street, N.W. Room 412 Washington, DC 20006 (202) 296-6613 [$25. minimum] Boye Needle Company 4343 North Ravenswood Chicago, IL 60613 (312) 472-0354 Brodart Eastern Division P.O. Box 3037 1609 Memorial Avenue Williamsport, PA 17705 (800) 233-8467 [no minimum] Brookstone Company 127 Vose Farm Road Peterborough, NH 03458 (603) 924-9511 [no minimum] DEMCO Box 7488 Madison, Wl 53707 (800) 356-8394 [no minimum] Dick Blick Company Box 1267 Galesburg, IL 61401 (800)447-8192 [no minimum] Gane Brothers & Lane, Inc. Mail Order Catalog Division 1400 Greenleaf Avenue Elk Grove Village, IL 60007 (708) 593-3360 [$10. minimum] Gaylord Bros., Inc. Box 4901 Syracuse, NY 13221 (315)457-5070 [no minimum] Holliston Mills P.O. Box 478 Kingston, TN 37662 (800) 254-0451 [no minimum] Joanna Western Mills Company 220 Broad Street Kingsport, TN 37660 (800)251-7528 [no minimum] Light Impressions Corporation 439 Monroe Avenue P.O. Box 940 Rochester, NY 14603 (800)828-6216 [no minimum] Northwestern Bottle Company P.O. Box 18071-B St. Louis, MO 63160 (314) 426-7000 Process Materials Corporation 310 Veterans Boulevard Rutherford, NJ 07070 (201)935-2900 [$40. minimum] S & S Brush Manufacturing Company 915 Broadway New York, NY 10010 Southern Illinois University General Stores/Carpentry Shop Carbondale, IL 62901 (618) 453-4305 110 TALAS 104 Fifth Avenue New York, NY 10011 (212)675-0718 University Products, Inc. P.O. Box 101, South Canal Street Holyoke, MA01041 (800)628-1912 Week Division (E. R. Squibble) P.O. Box 12600 Research Triangle Park N.C. 27709 (800)334-8511 Wal-Mart Highway 13 East Carbondale, IL 62901 (618)457-3368 ADHESIVES: INSTRUCTIONS FOR MIXING, DILUTING, AND USE Polyvinyl Acetate Adhesive [PVA] Polyvinyl acetate adhesive (PVA) is a synthetic emulsion adhesive. It is thick and nonflammable. It is water soluble in its emulsion/liquid state. (Most spills can be wiped up with a damp towel. Once dried, however, it is difficult to remove from materials, tools, or clothes.) Use and store it at room temperature, never near a heat source. PVA can be kept up to a year with neither loss of quality nor separation of chemical components. Most manufacturers recommend rotating stock after one year, however. After PVA has been diluted or mixed (with other adhesives), settling or precipitation does not occur, and it does not have to be remixed with every use. It also dries quickly straight from the bottle. (Store it in air-tight containers.) Dilutions and mixtures of PVA help to slow down this fast-drying quality, lengthening its workability, the amount of the time available to position or reposition materials. Polyvinyl acetate adhesive is not easily reversible; that is, components glued together usually cannot be taken apart without damage to them. (This is opposite to some natural adhesives, like wheat paste, which are easily reversible.) PVA is recommended for use on materials in general circulating collections. It should not be used on rare, special, unique, valuable, or local interest/history materials. (These should be treated by a trained conservator.) To prepare for most book repair procedures: Since PVA is thick (like opaque, white corn syrup), it should be diluted with water. The recommended dilution is 4:1; that is, 4 parts PVA to 1 part water. To prepare an 8 ounce container (such as that in the book repair kit), combine 6 ounces PVA with 1 1/2 ounces water. Mix thoroughly. Exceptions to this dilution are noted below. To prepare for tightening the hinges of a case bound book: The PVA should be diluted with water until it runs like thick cream from the end of the knitting needle (included in the kit), finally falling from the point in slow drops. The proportion is 7:3; that is, 7 parts PVA to 3 parts water. To prepare 200 milliliters (ml), using the graduated cylinder included in the kit, combine 140 ml PVA with 60 ml of water. (Add the water to the cylinder first, then the PVA.) Mix thoroughly. METHYLCELLULOSE Methylcellulose is another synthetic adhesive. It is mixed with water to make a paste, and it is used with Japanese paper to mend or tip in torn pages. It is also a component of "mixture," described below. Unlike wheat or rice starch paste (natural adhesives), methylcellulose does not spoil and can be stored almost indefinitely at room temperature in an air-tight container. To prepare methylcellulose: Put 1 ounce of water into a small cup. Sprinkle a little methylcellulose powder onto the water and beat it in (as you would gravy) until it is smooth and absorbed. Add more powder (sparingly) in the same way until the mixture is like runny cream of wheat. Let stand for twenty minutes or so, because methylcellulose swells. If the mixture is thick enough to hold the imprint of the fork or beater, add more water to loosen it up. If some of the water evaporates out during use, making the paste thicken, it may be thinned with water (at no loss of quality) until it is used up. PVA/Methylcellulose "Mixture" "Mixture" is used for applying/gluing down endsheets (pastedowns). To prepare "mixture": Mix methylcellulose paste and PVA together in a 3:2 proportion; that is, 3 parts methylcellulose to 2 parts diluted PVA. To prepare an 8 ounce container: first add one level teaspoon of methylcellulose powder to 3 ounces of water. Mix thoroughly. Second, add 2 ounces PVA (diluted 4:1) to the methylcellulose paste. Mix thoroughly. This mixture should thicken somewhat after twenty minutes. If too thick, add a small amount of water to loosen it. Use and store mixture as described above. 111
*Robert J. Milevski, is Preservation Librarian at Princeton University Libraries. Mr. Milevski developed and wrote this manual for the Illinois Cooperative Conservation Program (ICCP) in 1983 under a grant from the Illinois State Library to Southern Illinois University at Carbon-dale using Library Services & Construction Act funds. Although over ten years have passed since the manual was developed and issued, it continues to be very much in demand and is reprinted here again with permission of the author. The manual was originally reprinted in Illinois Libraries in October 1985. Mr. Milevski is planning to develop and publish a revised version of the manual in the future. He also continues to teach book repair workshops. 112 Directory, Illinois State Library
(Printed by the Authority of the State of Illinois) (X28014-5,850-04-95) Opinions expressed in signed articles are not necessarily those of the editors or the Illinois State Library
|Home|
|Search|
|Back to Periodicals Available|
|Table of Contents|
|Back to Illinois Libraires 1995|
|